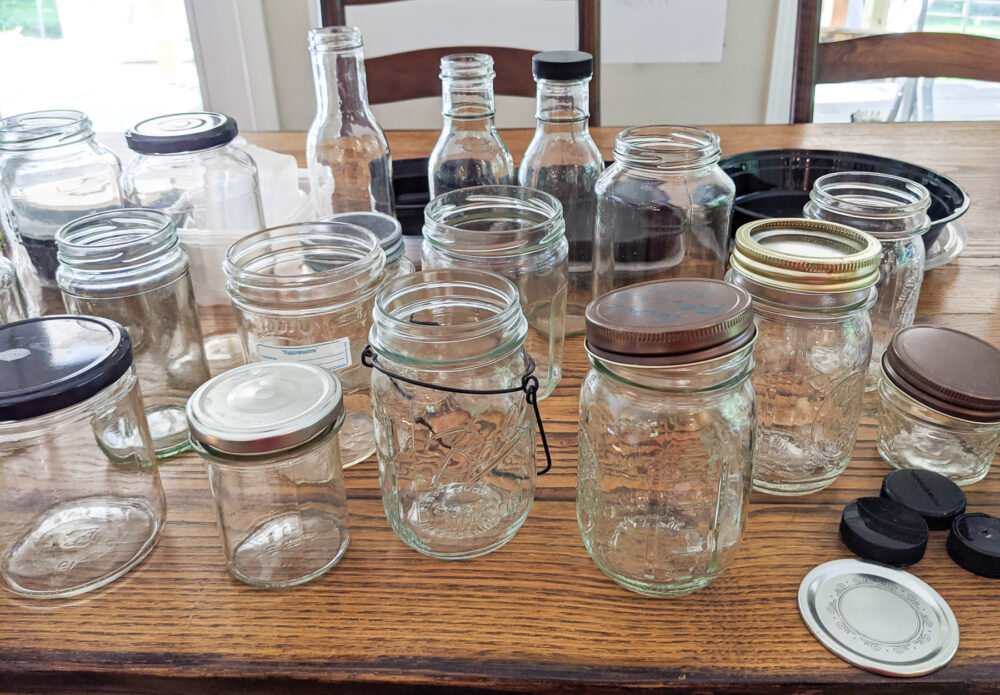
Comprehensive Guide To Clean And Sterilize Glass Jars For Reuse
We all know how handy glass jars can be in the kitchen. Whether you are storing homemade jams, spices, or leftovers, they are sturdy, reusable, and of course, eco-friendly. But here’s the thing: you can’t just reuse a glass jar straight out of the cupboard. Why, you wonder? If you have been storing your jars after the last use, chances are they will need a good cleaning and sterilization before you can safely store your food in them again. Let’s walk through the steps on how to clean and sterilise your glass jars properly, so you can get the most out of them while keeping your food safe and hygienic.
Importance of Cleaning and Sterilising Glass Jars
If you are wondering, “Why do I need to sterilise my glass jars if I’m just reusing them for dry ingredients or leftovers?” It’s a fair question! The truth is that even though glass doesn’t absorb food particles or bacteria like plastic, it can still trap bits of food or dust inside. If you have stored something like pickles or sauce, there could be leftover traces that could lead to spoilage of other ingredients or food items you store in the jar now. Plus, unclean and unsterilized jars allow room for bacteria to grow, especially if you plan to store food in it again.
Sterilising your glass jar properly can give you the peace of mind that no harmful germs are left behind, keeping your food fresh and safe to eat. So, whether you are planning to make homemade preserves or just want a clean jar for spices, follow these simple steps to keep things safe.
Best Tips to Clean and Sterilize Glass Jars for Reuse
Follow these simple tips to thoroughly clean your glass jars:
Step 1: Remove Labels and Residues
The first job when cleaning a glass jar is getting rid of the label. We have all been there when we were tirelessly scraping away at sticky glue residue. But that’s not the right technique. Here is what you should do instead:
- Soak It: Fill the glass jar with warm, soapy water and let it sit for about 30 minutes. The warm water helps loosen the label and any sticky bits.
- Scrape Off the Label: Then, use a plastic scraper or sponge to peel off the label. For any leftover glue, a bit of cooking oil or rubbing alcohol can do the trick to dissolve the stubborn bits.
- Clean the Jar: After the label and glue are gone, wash the jar with warm soapy water and scrub the inside with a brush. This will help you get rid of any old food residue left inside.
Step 2: Sterilising with Boiling Water
Now that the jar is clean, you can begin to sterilise it. This step is crucial if you plan to store food. Try this boiling water method:
- Make sure your jar is clean with no soap residue.
- Bring a pot of water to a boil on the stove.
- Carefully place your clean glass jar into the boiling water. Leave it to sit there for around 10-15 minutes. This is enough time to kill any lingering bacteria.
- Remove the jar carefully with tongs or an oven mitt since it will be hot.
By the time you are done, your jar will be sterilised and ready to store food.
Step 3: Using the Oven
What if you have a few jars to sterilise? The oven method works wonders when you need to do a batch at once. Try this oven method:
- Preheat your oven to around 120°C (250°F).
- Wash your jars thoroughly with soap and warm water.
- Place your clean jars upside down on a baking tray. Make sure they’re not touching each other.
- Put the tray in the oven and leave them for 20-30 minutes.
- Let the jars cool in the oven with the door slightly ajar.
Not only will the jars be sterilised, but they will also be nice and dry. This is a great method that saves you from handling hot water and avoids any accidental burns.
Step 4: Drying and Storing to Remove Leftover Moisture
Now that you have cleaned and sterilised your jars, you need to make sure they are completely dry before use. Any leftover moisture can lead to mould or bacteria growth, and you should avoid this at all costs, especially if you plan to use the jars for food storage.
- Air Drying: The simplest way is to place your jars upside down on a clean cloth or drying rack. Leave them for at least 30 minutes to air dry completely.
- Oven Drying: If you sterilized them in the oven, just leave the jars there until they cool. The residual heat helps to dry out any remaining moisture.
Once dry, you can store the glass jars in a clean, dry area until you are ready to use them again.
Additional Tips to Keep Your Glass Jar in Top Condition
A few extra tips can help you keep your glass jar in great shape for reusing:
- Baking Soda for Stubborn Residues: If the jar has tough food stains that are taking all the effort to remove, mix some baking soda with water to create a paste. Apply it to the stained areas and scrub. It works wonders for removing tough residues!
- Avoid Harsh Chemicals: Stick to natural cleaners like vinegar and baking soda. Harsh chemicals might leave behind unwanted residues, especially if you plan to store food.
- Check for Cracks: Before reusing any glass jar, check it well for cracks or chips. A cracked jar could lead to spills or contamination, so it is best to discard it if it is damaged.
Conclusion
Plan to reuse your glass jars? It is surely a great way to save money, reduce waste, and keep your kitchen organised. However, without proper cleaning and sterilisation of the glass jar, you risk compromising the safety of your food and your health. Follow the above-mentioned tips to remove labels, clean thoroughly, and sterilise properly so the jars are hygienic and ready for reuse.